How to start with Microcontrollers

Microcontroller Topics
User avatar
Neo
Site Admin
Site Admin
Posts: 2642
Joined: Wed Jul 15, 2009 2:07 am
Location: Colombo

Re: How to start with Microcontrollers

Post by Neo » Fri Jun 17, 2011 8:12 pm

10K Resistor pin 38 to GND
That's a mistake in the PICKit3 tutorial. It should be pin 36 (PGM). Sorry for that.
Can you correct that.

Why do you use a separate location for programming. Can you wire PICKit3 to the same circuit. That's how it is used in professional environments.
User avatar
DPX
Sergeant
Sergeant
Posts: 13
Joined: Tue Jun 14, 2011 5:28 pm
Location: Melbourne, Australia

Re: How to start with Microcontrollers

Post by DPX » Fri Jun 17, 2011 8:28 pm

I am programming separately just to simplify things while I am learning. I thought that way nothing in my led circuit would affect the programming onto the chip and nothing in my programming circuit will affect operation of the led. I will use the same location in future.

Just to clarify whe programming it doesn't matter what other pins are connected, as long as the pins used to do the programming are set correctly?

So at the moment I am still at that same point and don't really know where to go from here.

Do you know why placing my finger on the 1K Resistor on pin 2 is making the LED blink. Any other suggestions as to what could be the problem?

Thanks for all your time.
User avatar
Neo
Site Admin
Site Admin
Posts: 2642
Joined: Wed Jul 15, 2009 2:07 am
Location: Colombo

Re: How to start with Microcontrollers

Post by Neo » Fri Jun 17, 2011 11:12 pm

I am programming separately just to simplify things while I am learning.
No problem with that. As long as you don't use the programming pins in your target device, using the same circuit is also fine.
Just to clarify when programming it doesn't matter what other pins are connected, as long as the pins used to do the programming are set correctly?
Yes. This is no problem at all in our application.
So at the moment I am still at that same point and don't really know where to go from here.
Don't panic. These things happen all the time :)
Do you know why placing my finger on the 1K Resistor on pin 2 is making the LED blink. Any other suggestions as to what could be the problem?
It could be a loose connection on your board. Have you tried putting the resistor in another hole? If the grounded end made it to work, then I would have suspected the ground of your circuit.

I have observed your wiring again on the latest images. Notice the red dots.
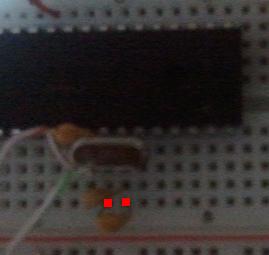
c1.JPG
c1.JPG (7.65 KiB) Viewed 7269 times
For me it seems like, the cap is connected to pin 13 and 14. If that is the case, this is completely wrong.
For pin 13 and 14, the oscillator must be connected. One 20pf cap from pin 13 to ground. Another 20pf cap from pin 14 to ground. Can you verify this?
Thanks for all your time.
You are welcome DPX. Once I get you started, I expect you will help others through ROBOT.LK just as I do. Lets share our knowledge as much as possible in this short life time.
User avatar
DPX
Sergeant
Sergeant
Posts: 13
Joined: Tue Jun 14, 2011 5:28 pm
Location: Melbourne, Australia

Re: How to start with Microcontrollers

Post by DPX » Sat Jun 18, 2011 2:09 pm

Good news everyone!

Just letting you know i have got it working. After rearranging the circuit to allow programming and testing in the same circuit when connecting power the LED was blinking successfully. I made small alterations to the code (increasing the delay, and simply leaving the LED on etc.) and was seeing the changes reflected in my circuit so quite happy about that. I think the issue was perhaps a loose wire or connection from the programming circuit when testing the LED. Not too sure it could have been a combination of all the things discussed .i.e moving the oscillator closer to the chip, altering the configuration for the programming. It seems having a separate location for the programming achieved the opposite of what i intended which was to simplify things lol.
Neo wrote: You are welcome DPX. Once I get you started, I expect you will help others through ROBOT.LK just as I do. Lets share our knowledge as much as possible in this short life time.
I will do my best to assist. I may be able to help others application/web programming however I think it will be some time before I have the knowledge to pass down to others in this area.

Thanks again for all your help Neo. I felt like an eager little kid waiting for your posts to be able to get this working. :D
User avatar
Neo
Site Admin
Site Admin
Posts: 2642
Joined: Wed Jul 15, 2009 2:07 am
Location: Colombo

Re: How to start with Microcontrollers

Post by Neo » Sun Jun 19, 2011 8:41 am

Excellent !!!
It seems having a separate location for the programming achieved the opposite of what i intended which was to simplify things lol.
Since you have now moved the PICKit3 to your target circuit, you can use the debug functionality as well. You can put breakpoints and see the values on variables, etc... just as you do in PC. This is sometimes very helpful to get things sorted out faster.

Good luck!!!
Post Reply

Return to “Microcontrollers”